


OSV Giving Admin Setup Checklist
Table of Contents
This is a full checklist of the setup an administrator would go through when setting up a new online giving account for the church.
Admin Login
Login to the OSV Hub at https://osvhub.com/staff
- If you already had a OSV Hub account, you will log in and will see the new option for Giving.
- If you are new to the OSV Hub, a new user email will be sent to your email address. Click the link in the email and create your password.

Giving
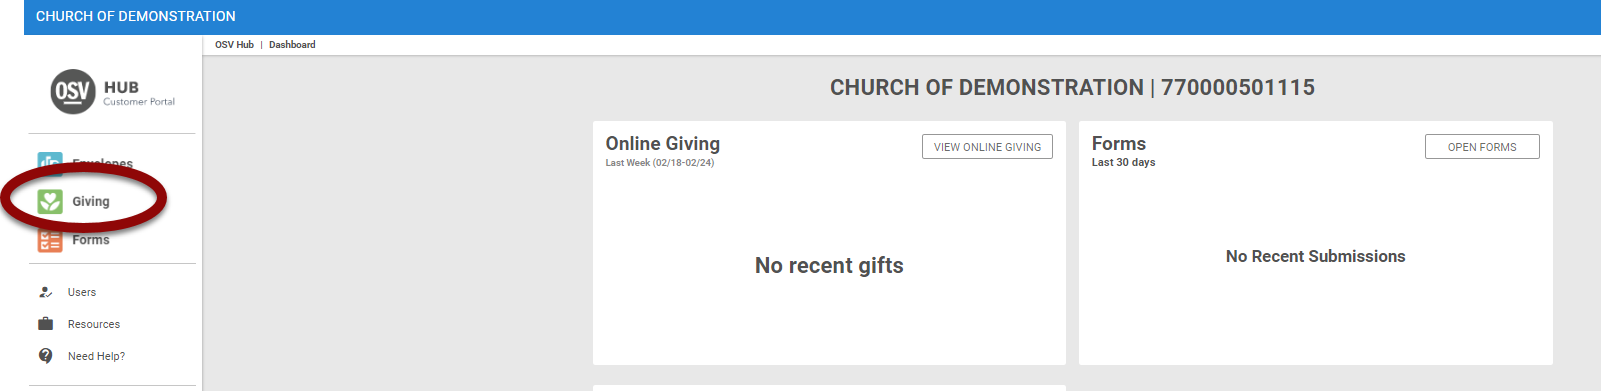
Once you log into the OSV Hub, your screen will look similar to Figure 1. You will not have any funds set up if this is the first time you are logging into Giving.
- Click ‘View Online Giving’ in the Online Giving Card or click on ‘Giving’ on the left-hand side of the screen.
2. If this is the first time you are logging in, you should see the below image. Click on the ‘Let’s Get Started’ button.

3. You should then be prompted to set up your online giving Funds. Click on ‘Setup Funds.’

Adding First Fund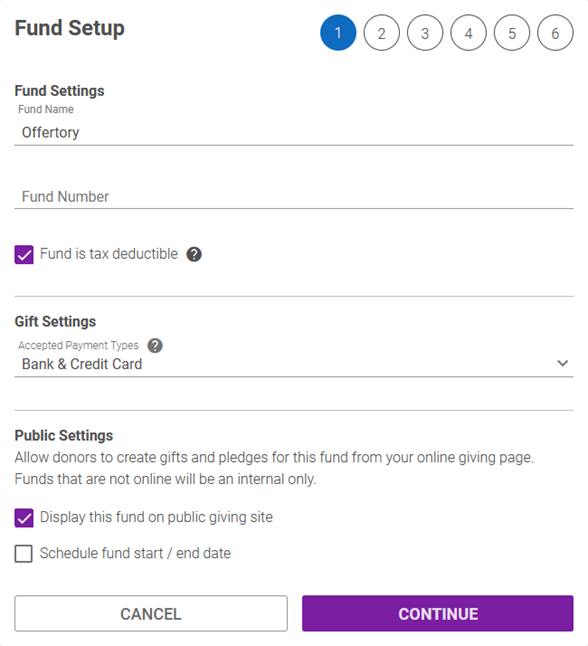
-
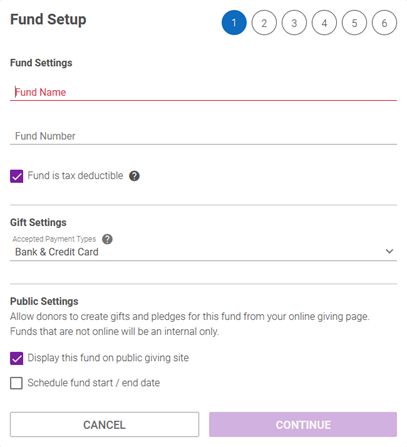
Fund Name– In this initial walkthrough, you can see Offertory has been suggested.
- This is the Name that the donors will see for the fund.
- If you are using PDS for your church management software, this field needs to be the Activity Name from PDS to be able to import into your system.
- This is the Name that the donors will see for the fund.
-
Fund Number
- This field is for a fund number from your church management software. This only needs to be completed if you are going to import your file into your software.
-
Fund is tax deductible
- The option is selected by default. You should leave this selected if the fund/collection is a donation.
- If the fund is for payments instead of donations, you can uncheck the box; funds that are not tax deductible will be excluded from the tax report.
- The option is selected by default. You should leave this selected if the fund/collection is a donation.
-
Gift Settings – Accepted Payment Types
- This will allow you to set the forms of payment that you will accept for this fund. You will only see the options that you are approved to accept by the payment processor.
- Bank & Credit Card – Checking, Savings, and Credit Cards
- Bank – Checking and Savings only
- Credit Card – Credit Cards only
- This will allow you to set the forms of payment that you will accept for this fund. You will only see the options that you are approved to accept by the payment processor.
-
Public Settings
-
Display this fund on public giving site– When selected (selected by default), this fund will show up on your public giving page and allows donors to create gifts/pledges for this fund.
- If you uncheck this option, the fund will be created for internal use only.
-
Schedule fund start/end date – If you want the fund to turn on in the future, you will check this option and enter the date you want the fund to become active. If you want the fund to be available right away, you will not check this box.
- If you want the fund to turn off on a specific date, you will check this option and enter the date you want the fund to become inactive. The donors’ donations will no longer process as of this date.
- You can schedule a start date but no end date, and vice versa.
-
Display this fund on public giving site– When selected (selected by default), this fund will show up on your public giving page and allows donors to create gifts/pledges for this fund.
-
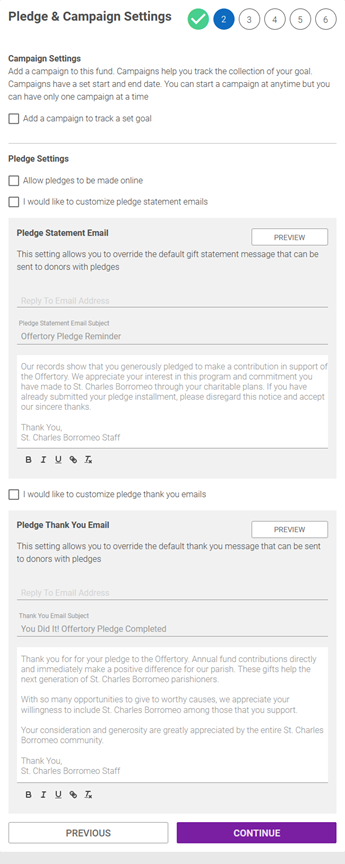
Campaign Settings
-
Add a campaign to track a set goal– If you wish to track the collection of a goal, you can turn this on.
- Campaigns require a set start date and end date. You can start a campaign at any time, but you can have only one campaign at a time.
-
Add a campaign to track a set goal– If you wish to track the collection of a goal, you can turn this on.
-
Pledge Settings
- Allow pledges to be made online – Turn this on if you want donors to be able to make pledges online for this fund.
- I would like to customize pledge statement emails – Check this option if you wish to customize the gift statement messaging the system emails out to donors.
- I would like to customize pledge thank you emails – Check this option if you wish to customize the thank you messaging the system emails out to donors.
-
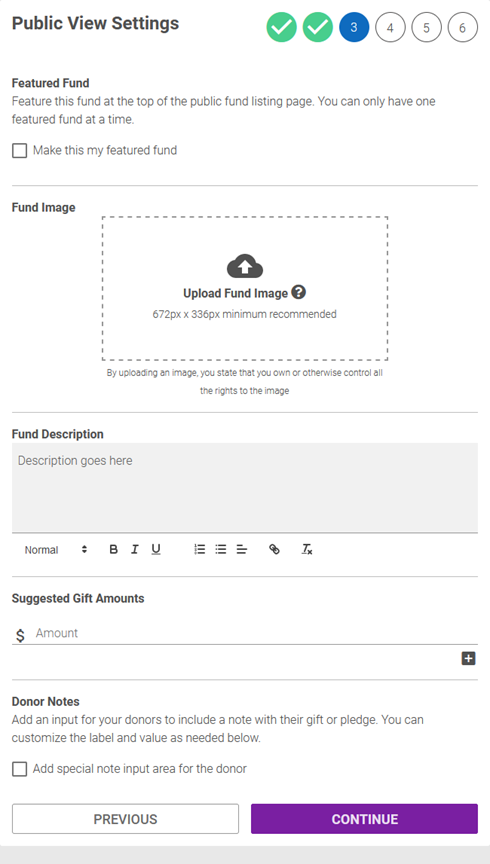
Featured Fund
-
Make this my featured fund– Check this option if you wish to feature this fund on your public fund listing page.
- Featuring a fund keeps it at the top of the page and calls more attention to it. You can only feature one fund at a time, and you can change your featured fund any time.
- If you choose not to feature a fund, it will appear in your public fund listing with the other non-featured funds.
-
Make this my featured fund– Check this option if you wish to feature this fund on your public fund listing page.
-
Fund Image
- An image can be uploaded for the fund, if desired. You can drag and drop an image into the designated upload area, or click on the box to locate the image on your computer.
- Images must be owned by your organization, or you must have the rights to use the image. By loading the image, you state that you own or otherwise control all the rights to the image.
- A default image will be used if you do not customize your image.
- We also have made a library of images available for you to use, if desired. You can view and download those images by clicking here.
-
Fund Description
- You can enter a more detailed description of your fund in this field. You can use the buttons to format this text and add any links, if desired.
-
Suggested Gift Amounts
- You can enter suggested gift amounts, if desired. Type in an amount and then click the ‘+’ button. This feature is optional, and multiple amounts can be entered.
-
Donor Notes
-
Add special note input area for the donor– Checking this box will allow the donor to include a note with their gift or pledge.
- You can customize the Input Label (e.g. “Gift Notes”) and the Input Value (e.g. “Enter your note here”) that are presented to the donor.
-
Add special note input area for the donor– Checking this box will allow the donor to include a note with their gift or pledge.
-
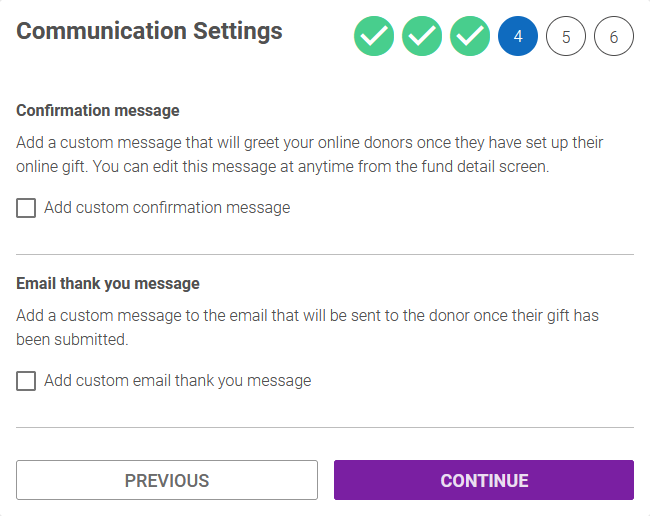
Confirmation message
- Add custom confirmation message – Check this box if you wish to add a custom message that will greet your online donors once they have set up their online gift. You can edit this message at any time from the fund detail screen.
-
Email thank you message
- Add custom email thank you message – Check this box if you wish to add a custom message to the email that will be sent to the donor once their gift has been submitted.
-
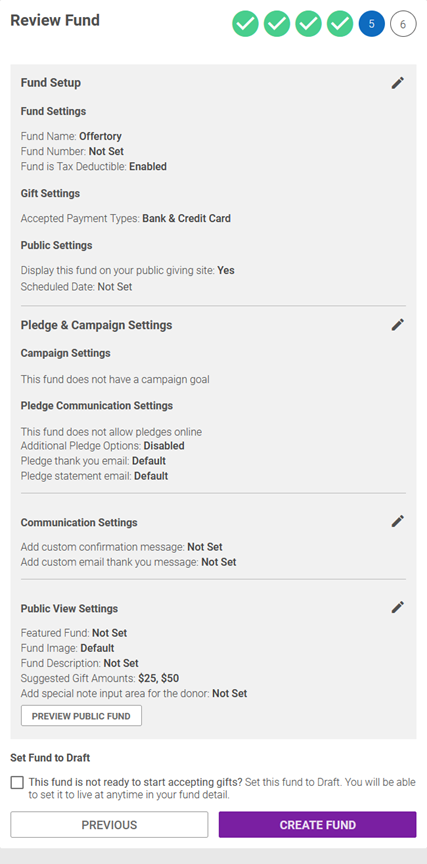
Review Fund
- This screen gives you the opportunity to review all the fund settings you’ve selected.
- Click the pencil icon in the corner of a section if you need to make any changes.
- Click the ‘Preview Public Fund’ button near the bottom of the page if you’d like to see a preview of the fund as the donor would see it.
- This screen gives you the opportunity to review all the fund settings you’ve selected.
-
Set Fund to Draft
-
This fund is not ready to start accepting gifts?– You can check this option if you wish to keep the fund in draft mode.
- If you choose this option, you will need to go into your fund detail settings later and set it to ‘Live’ before your donors will be able to see it and set up a gift for the fund.
-
This fund is not ready to start accepting gifts?– You can check this option if you wish to keep the fund in draft mode.
-
Create Fund
- Click the ‘Create Fund’ button to finish setting up the fund. You can always come back later and edit a fund’s settings.

-
Fund Complete
- Your Fund is now either scheduled or live.
- You will now find the URL to promote the one fund, if you wish.
- Click the ‘Back To Funds’ button.
-
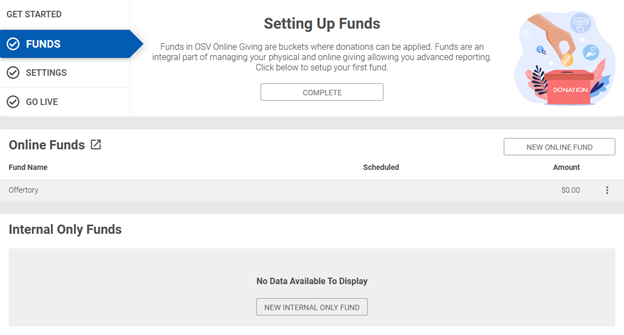
Setting Up Funds
- Once you have set up a fund, you will see it listed in your Online Funds area. You will need to have at least one fund set up for your donors to give to before going live. You can always add more funds later.
- Click the ‘Complete’ button in the Setting Up Funds area to move onto the Giving Settings.
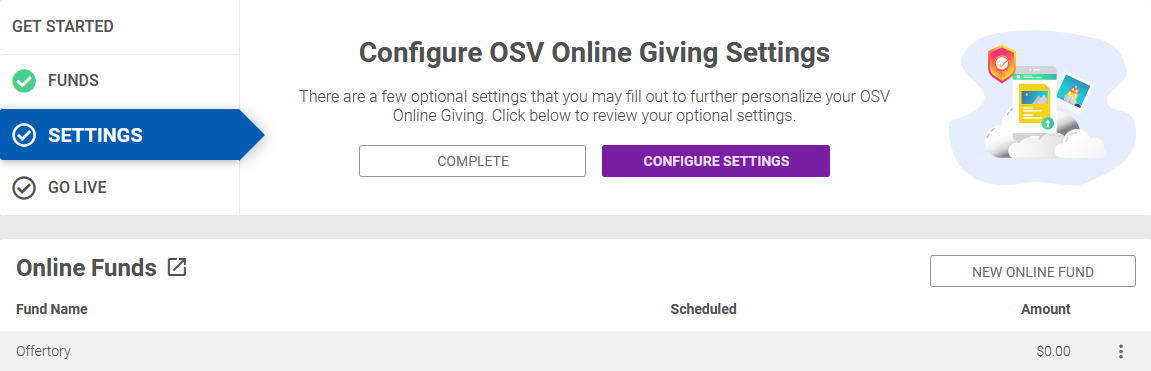
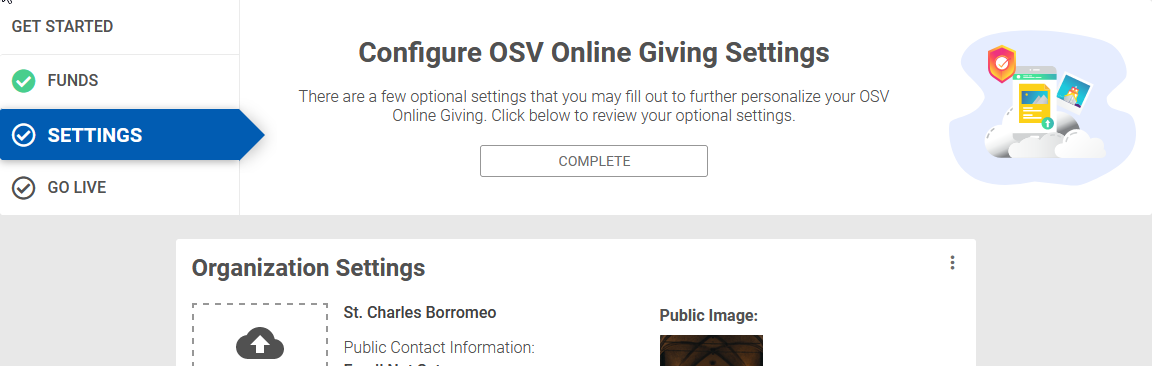
Settings
To see and change your Giving settings, click the ‘Configure Settings’ button.
Organization Settings
Organization Settings allow you to add or update changes to your overall organization in the Hub.
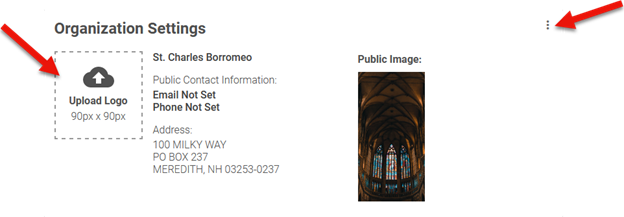
- Upload a logo for your organization by clicking in the Upload Logo box. You will then be able to drag and drop a photo or click ‘Browse’ to select a photo from your local files.
- Click the dots in the right corner to change the name, contact info, primary address, or public image for your organization.
Giving Settings
Giving Settings allows you to change and view the overall settings that will impact your donors.
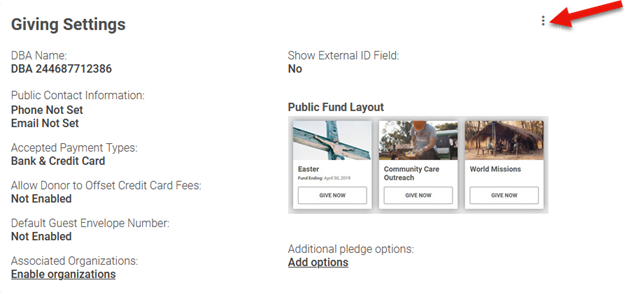
- Click the dots in the right corner and click ‘Edit Giving Settings’ to make changes to the Giving contact email, contact phone, and toggle on/off the option to accept American Express (if you accept credit cards).
a. The contact email will show near the church logo on all pages the donor sees and will also be the reply-to email on all notifications sent to donors on behalf of your organization. If your organization is using Forms, this email will be displayed on all Form pages as well.
2. You can also edit other settings by clicking the three dots in the corner, such as Offset Processing Costs, Default Guest Envelope Number, and Public Fund Layout.
a. Edit Offset Processing Costs – Checking this option offers the option for donors to offset the credit card fees along with their online gifts
b. Edit Default Guest Envelope Number – Turn this on if you would like to update all guest accounts without an envelope number to a default number.
c. Change Public Fund Layout – The Public Fund Layout allows you to choose between a list view or picture view for the funds list on your public fund listing page.
3. Once you have updated all Settings, click the ‘Complete’ button.
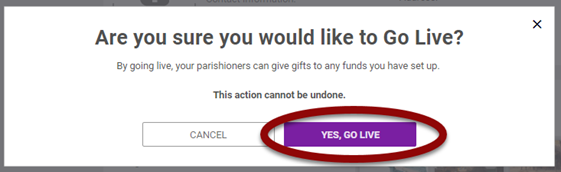
Go Live
After reviewing the Online Giving settings, click the ‘Let’s Go Live’ button to begin accepting gifts. Once you click the button, there is no way to revert the selection, but you are always able to make changes to all of the funds and settings.

Because this action is not reversible, you will have a confirmation prompt when you select ‘Let’s Go Live.’ Click the ‘Yes, Go Live’ button to confirm.
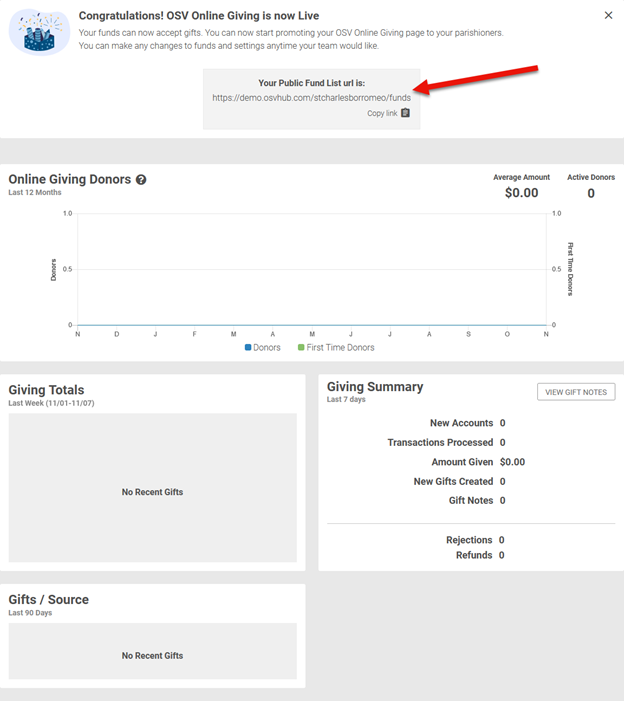
Once you have selected to go live, you will be taken to your Giving Dashboard. At the top of this page, you will see your Public Fund List URL and you will have an option to copy the link.
This is the URL that you will be using on your website and marketing materials to direct donors to your Giving site. You can always visit this link to view the public fund list to see what your donors will be seeing.
Adding Additional Funds
- Click on ‘Funds’ in the left column under ‘Giving.’
- Click the ‘New Online Fund’ button.

If you have Managed Giving turned on and would like to create a fund that is not available to your independent donors, click the ‘New Internal Only Fund’ button.

- Fund Setup
- Enter a name for the fund as well as the other settings you will want for this new fund.
- Click the ‘Continue’ button and proceed to set up the fund, following steps 2-6 in the setup wizard, as you did when you set up your first fund.
Editing Funds
- Click on ‘Funds’ in the left column under ‘Giving.’
- In your list of Online Funds, click on the name of the fund you wish to edit.
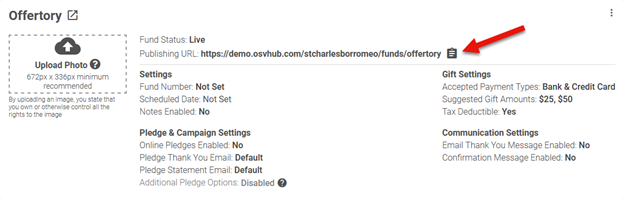 3. Click the clipboard icon next to the Publishing URL to copy the link to your clipboard.
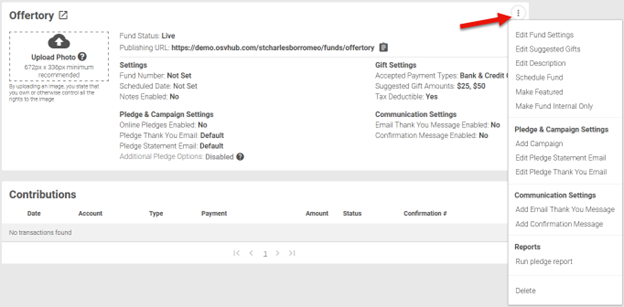
4. Click the three dots in the top right corner to bring up the options menu and edit the fund as needed.
5. Edit Fund Settings
- Fund Name – Changing the fund name will change the direct URL for that fund.
- Fund Status – Changing to Draft will make the fund inactive; this will cancel any donations scheduled to this fund. Changing to Live will make the fund available to donors.
- Fund Number – Editing the fund number will not affect donations; it will only affect the import into your contribution program.
- Accepted Payment Types – Bank, Credit Card, or Bank & Credit Card. Changing this will not change existing gifts that are scheduled using a payment method you remove.
- Allow pledges to be made online
- Fund is tax deductible
-
Allow donors to create notes on a gift
6.Edit Suggested Gift Amounts
7. Edit Description – Select to add or edit the description of this specific fund.
8. Schedule Fund – Schedule fund start date and/or Schedule fund end date
a.Start Date – Setting or changing this date to a future date will make the fund inactive and any currently scheduled donations will be canceled. b.End Date – Setting or changing this date will cancel any donations currently scheduled outside of this date.
9. Make/Remove Featured – Select to make or remove this fund as the Featured Fund.
10. Make Fund Internal Only – Select this to remove the fund as an option in the public list for your donors.
11. Pledge & Campaign Settings
- Add Campaign
- Campaign Goal
- Campaign Start Date
- Campaign End Date
- Show campaign progress and goal on public site
- Edit Pledge Statement Email
- Reply To Email Address
- Pledge Statement Email Subject
- Body text of email
- Edit Pledge Thank You Email
- Reply To Email Address
- Thank You Email Subject
- Body text of email
12. Communication Settings- Add Email Thank You Message
- Add custom email thank you message
- Add Confirmation Message
c. Add custom confirmation message
13. Reports
a. Run Pledge Report – This will run a pledge report for this particular fund. You can also access this report in the Reporting menu.
14.Archive/Delete
a. Depending on the fund, you will only see one option or the other: Archive or Delete.- Archive – If this fund has ever received a donation, it can only be archived (deactivated).
- Delete – If this fund has never received a donation, then you will have the option to delete the fund.
- Add Email Thank You Message
Public Fund List Page
- Click on ‘Funds’ in the left column under ‘Giving.’
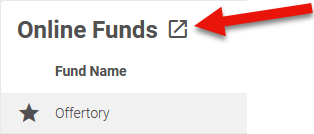
- Click on the
 icon next to ‘Online Funds.’
 - This will take you to your public fund list page, which is the page visible to your donors. Highlight and copy the link listed at the top of this page to use on your website and printed materials.
Copying the URL of a Fund
- Click on ‘Funds’ in the left column under ‘Giving.’
- In your list of Online Funds, locate the name of the fund for which you want the URL.
- Click on the three dots to the right of the fund to reveal the menu of action items for that fund.
- Click on ‘Copy URL.’
- The URL that will direct your donors directly to that fund is now copied to your clipboard. You can use this on your website or printed materials, or use a third party to create a QR code for donors to scan with a mobile device.
Make Featured/Remove Featured
- Click on ‘Funds’ in the left column under ‘Giving.’
- In your list of Online Funds, locate the fund that you want to Make Featured or Remove Featured.
- Click the three dots in the top right corner to bring up the options menu.
- Click on ‘Make Featured.’
- This will make the fund featured and you will see a star to the left of the fund name to signify this.
- Featuring a fund keeps it at the top of the public fund list page and calls more attention to it.
- Click on ‘Remove Featured.’
- This fund will no longer be featured at the top of the public fund list page and the purple border is removed.
- The star is removed from the left of the fund name.
- If you wish to make another fund featured, you can skip the Remove step. Since only one fund can be featured at a time, you can simply make another fund Featured, which will automatically remove the Featured status from the previously featured fund.
- Click on ‘Make Featured.’
Reorder Funds
- Click on ‘Funds’ in the left column under ‘Giving.’
- Find the fund that you want to reorder or change in the order that the funds appear.
- Click on the three dots to the right of the fund to reveal the menu of action items for that Fund.
- Click on ‘Reorder.’
- Click on the two lines to the left of the fund name and hold down the mouse button as you drag the fund to the new location.
- Release the mouse and the fund will show in the new location.
- Once you have all the funds arranged how you would like them, click the purple ‘Save Reorder’ button.
- If you do not want to save the changes that you have made, click the ‘Cancel’ button.

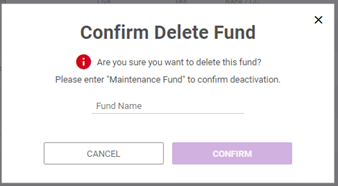
Delete
This will delete the fund and donors will no longer be able to see or donate to this fund. This will also cancel any scheduled donations to this fund. Only Funds that have never received contributions can be deleted. Any Funds that have received contributions will need to instead be Archived (see next section).
- Click on ‘Funds’ in the left column under ‘Giving.’
- Click on the fund that you want to delete, which will open it.
- Click on the three dots in the top right corner of the fund detail page, and then choose ‘Delete’ from the menu options.
- The Confirm Delete Fund box opens.
- You will need to type the name of the fund that you are deleting in the Fund Name field.
- Once the name is entered, you can click the purple ‘Confirm’ button. This is a safety feature to make sure that you really want to delete the fund and stop any giving to it.
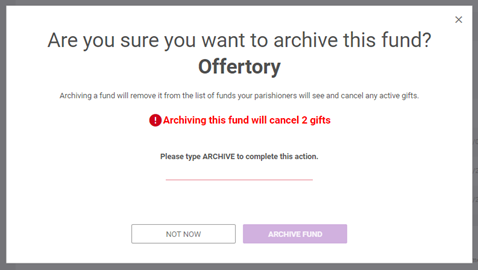
Archive
This will remove the fund from the Public Fund List and donors will no longer be able to see or donate to this fund. This will also cancel any scheduled donations to this fund. An archived fund can be reactivated in the future, if desired.
- Click on ‘Funds’ in the left column under ‘Giving.’
- Click on the fund that you want to archive, which will open it.
- Click on the three dots in the top right corner of the fund detail page, and then choose ‘Archive’ from the menu options.
- The confirmation box opens.
- You will see a notification in red of how many gifts will be cancelled by this action.
- You will need to type ‘ARCHIVE’ in the field to complete the action.
- Once ‘Archive’ is entered, you can click the purple ‘Archive Fund’ button. This is a safety feature to make sure that you really want to archive the fund and stop any giving to it.
Contributions
This will show you all the contributions given through a fund, will allow you to view the details of those contributions, and will allow you to process a refund.
- Click on ‘Funds’ in the left column under ‘Giving.’
- Click on the fund for which you want to view contributions, which will open it.
- The second section on this fund detail page shows all recent Contributions.
- Click on the three dots to the right of a contribution to reveal the menu of action items for that contribution.

5. To see the details of any contribution, click on the ‘View Details’ option in the menu. You will see:
- Donor Name
- Donor Email
- Envelope Number
- Fund Name
- Payment Method
- Confirmation Number
- Amount
- Source
- Status
- Recorded Date
- Processed Date
- Last Updated

- To issue a refund, click on the ‘Refund’ option in the menu.
a. You must select a refund reason from the dropdown, and then click the purple ‘Submit’ button.
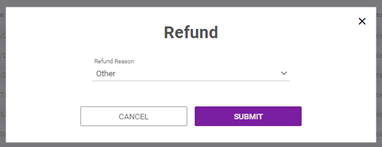
b. The refund will process for the full amount and you will now see the line in yellow with the refund icon to the left. Hover over this icon to see more details of why the refund was issued.
